What is a stack?

The central metaphor of Factor is "stacks" of "cards" on a "board". Think of a stack as a flexible container for any set of information that you want to organize. A stack can represent a problem to solve, a strategic priority, a step in a process flow, a bucket of ideas for content, or anything else you might find useful.

How do I create a stack?

To create a stack:

  1. Click on the workspace where you would like to add it
  2. Click “Board” below the workspace name to land in the Board app
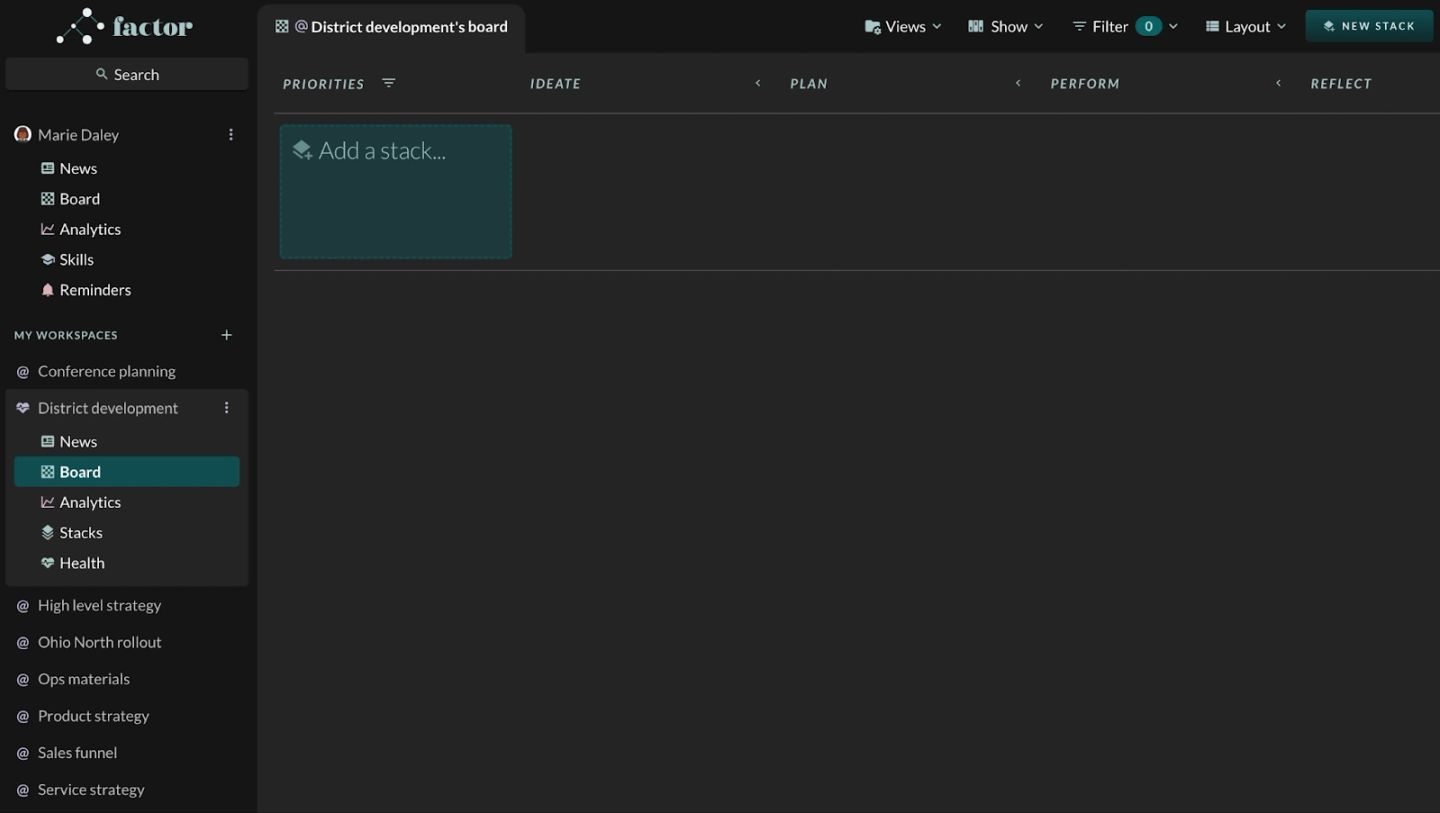
  3. If the workspace has no stacks yet, there will be a big “Add stack” button in the main area of the page, right under the column label “Priorities”. Click into this area, type out a name for the stack, and hit enter on your keyboard. The stack will pop into place. Also, the stack’s side panel will pop up on the right. The side panel is where you manage the stack’s data and content.
A brand-new empty board, "@ District development's board", with nothing in it but a single dashed tile reading "Add a stack…" under the "PRIORITIES" column heading. The work-stage columns "IDEATE", "PLAN", "PERFORM" and "REFLECT" are present but bare, which is what makes the tile the only thing to click on a fresh workspace.
The same board a moment later, the typed name now sitting in the tile as the first stack: "How might we introduce 50 new qualified school districts to our services this quarter?" in the "PRIORITIES" column. Nothing else has been added yet — the stage columns are still empty — so the stack exists before any of its cards do.
The new stack's side panel opened on the right half of the screen, titled "How might we introduce 50 new qualified school districts to our services this quarter?" with its owner avatar beneath. The tab row reads "Cards", "Posts", "Fields" and "Actions", with Posts selected and showing the only entry so far, "Marie created this stack 3/23/2023", above a composer prompting "Type '/' to insert. Type @ to mention someone" with "FULL SCREEN" and "POST" controls. This panel, not the board, is where a stack's content and data live.
  1. If the workspace already has a stack in it, close any open side panels by clicking the X near the top left of the side panel. Then, click the “New stack” button at the top right of the page.
The board with its one stack and no side panel open — the state the second-stack instructions assume. The "NEW STACK" button is clear at the top right next to "Views", "Show", "Filter 0" and "Layout", and the stack now offers an "Add a card…" tile in the IDEATE column.
  1. A new stack will show up on the board, and a new right panel will pop up. Type in the name of the stack and hit enter.
A second stack created by the "NEW STACK" button, and it arrives unnamed: the board shows a card reading "untitled stack" above the existing districts stack, and the side panel on the right is titled "untitled stack" with the Posts tab open on "Marie created this stack 3/23/2023". The name has to be typed in before the stack means anything, which is why the panel opens focused and waiting.

How do I change the owners of a stack?

Stacks can have owners. The owners of a stack are typically the people responsible for making sure that the stack is executed properly. Stack owners are notified any time an update is made to the stack. Therefore, if there’s someone who will want to stay informed on the stack, it can be helpful to make them an owner.

To make someone an owner of a stack:

  1. Click on the stack to open its side panel.
  2. Click on the “Fields” tab. Here you can edit information relating to the stack, including its owners.
  3. Owners” is the first field in the tab. Click into this section, search the name of the colleague you want to make an owner, and click their name to add them to the list.
The "Fields" tab of a stack's side panel, which is where ownership is edited. The left rail groups the fields — "SYSTEM FIELDS" ("Owners", "Workspaces"), "CUSTOM FIELDS" with the note "This stack doesn't have any custom fields yet.", and "PLANNING FIELDS" ("Precedents / blocked by", "Dependents / blocking") — while the right pane opens on "Owners" as the first field, holding a removable "Marie" chip with an x on it and an open dropdown of colleagues to add. An "+ ADD FIELD" button sits above.
  1. Repeat for as many colleagues as you’d like to make owners of the stack.
  2. To remove someone as an owner, click the X on the right side of the chip with their name.