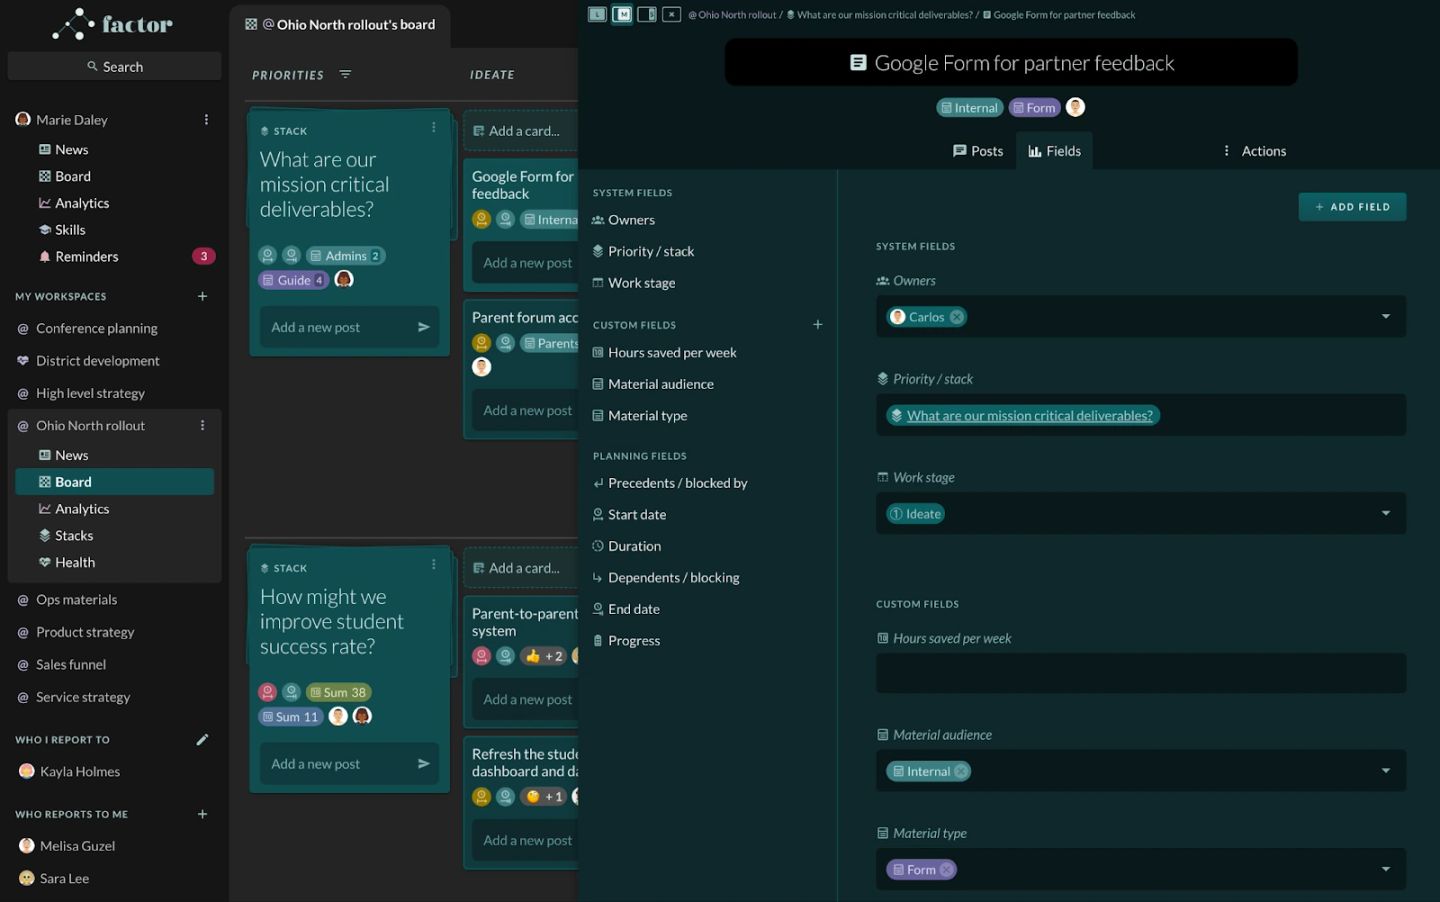
How do I use data fields to customize cards and stacks?
Data fields are one of the most powerful features in Factor. Among other things, data fields allow you to:
- Categorize cards across an infinite number of dimensions
- Aggregate quantitative information in a stack
- Get much more information from a board at a quick glance
- Organize a Kanban view into whatever columns you want
The options for types of custom data field are:
- List of items. This is great for categorizing cards qualitatively/verbally - e.g., type of client (startup, small business, large business, enterprise).
- Date. This is great for associating important moments in time with cards - e.g., date of first check-in on a new client engagement.
- Numeric. This is great for quantitative measures associated with a card - e.g., the dollar amount of a client engagement.
- Text. This is great for associating a key phrase with a card - e.g., the core team you’re working with at the client (such as “Alex, Sam, and Jordan”).
Stacks and cards come with some data fields by default. To find the fields associated with a card or stack, click on it to open its side panel, then click on the “Fields” tab.

There are two ways to add a data field to a stack.
Method #1:
- On the stack to which you want to add the data field, click on the three-dot menu
- Hover over "Add field".
- Select from the list of options, or select "Copy fields from another stack".
- If you selected one of the field types, start typing a name for your field. This will automatically start a search for existing fields. It's worth checking if a field you want to create already exists within Factor, as it often makes sense to use an existing one rather than make a new one.
- Give the field a name. This will bring up a menu where you can customize the field a bit more. You can give it a description, choose its color (which will be the color of its chip when it is toggled on in the Show menu), and select whether it applies to just the current stack, all stacks on the board, or a subset of all stacks on the board. You can also select whether a card can have multiple values for the same field.
- If you selected "Copy fields from another stack", start typing the name of the workspace or stack you want to copy from. Once you pick a stack, its fields will be added to the current stack.


Method #2:
- Click on the stack to which you want to add the data field.
- Click on the “Fields” tab.
- In the left panel of the tab, click the plus button next to the label “Custom Fields”.
- Choose which type of custom field you would like to create. (See above for the set of options.)
- Give the field a name. This will bring up a menu where you can customize the field a bit more. You can give it a description, choose its color (which will be the color of its chip when it is toggled on in the Show menu), and select whether it applies to just the current stack, all stacks on the board, or a subset of all stacks on the board. You can also select whether a card can have multiple values for the same field.
How do I modify what content is shown on the board?
Because cards are so robust, card faces can get sort of cluttered. Between owners, emojis, custom fields, pinned posts, and more, you might decide that you don't need to see everything associated with every card in a given view. Using the Show menu allows you to customize what data and information you see on cards and stacks without having to click into them for more information. The Show menu is located in the upper right of the page. Click on it to reveal the options for what to show (most options are hidden by default). As you toggle options on and off, the board’s appearance will update in real time.

To update a card’s value for a given field, open its side panel, go to the Fields tab, and scroll until you find the field. You can directly edit its value there. You can also click the three-dot menu to the left of its title and click “Edit field settings” to update its settings.
How do I save views on a board?
Saved views are a way to expand any workspace’s board while keeping it hyper-organized. They make it possible to pivot and regroup the cards and stacks while simultaneously making it very easy to manage associated units of work that require different workflows. Like data fields, saved views are one of the most powerful features in Factor.
To save a layout as a saved view:
- Using the left panel, navigate to the Board of the workspace for which you’d like to set up a saved view.
- At the top of the page, near the middle, click on the folder icon.
- Click “Add new view”.
- Select the type of view you would like to save. The new view will be saved as a tab at the top of the board. By default, it will be called [Your name]’s view. It’s best to update the name to be meaningful for the entire team, so that anyone can know at a glance what the view’s purpose is. If it is the first view you’ve saved, it will become the default view for the board. That means that if someone navigates to the board, it will be the first view they see.
- Use the Filter and Show menus to manipulate the board to contain the stacks and cards you want in your saved view.
- To save the changes, click the three-dot menu next to the title of the saved view in its tab, then click “Save changes for all users”. NOTE: THIS WILL CHANGE HOW THE BOARD LOOKS FOR EVERYONE, NOT JUST YOU. If you ever manipulate the board and want to revert it back to its most recently saved settings, click “Reset view to last saved version” from this same menu.
- To make a saved view the default for the workspace, click “Set as default” in the three-dot menu.
